So here is something I have been wanting to try for a while.
This craft is so easy and there is no end to the cool things you can do!
I already have about 10 ideas for more books in my mind!

For my first two attempts, I decided to go with replicas from movies I like.
This a simple and easy replica from the Evil Dead 2.
I just took an old hard cover book.
This one is just some mediocre cookbook.

I drew on the face, just sort of eyeballed it not trying to be exact.

I built up his features and some big wrinkles with paper mache paste and paper towels.
Then I covered it with a skin of paper mache napkins and paper towels.

I let it dry to the touch opened like this for just a little bit.
Then I bound it shut with twine until it was completely dry, for about 2 days.
Unfortunately I didn't take a picture but this step but it is a very important.
If you don't the book cover can warp out too much.

Yes, that is an ear on the other side.

After he was dry I began the painting. I used raw umber for the base color, red for the mouth parts.

I did a black wash and then dry brushed on gray.
I highlighted the teeth and the one eye with a dry brush of yellow ochre.
The next is a little more complicated and I got a little carried away.
I started with a large cardboard book box I got on clearance at Micahel's

I know it's pretty, and I am about to destroy it!
I was actually a little sad because despite my dark inclinations, I do like butterflies.
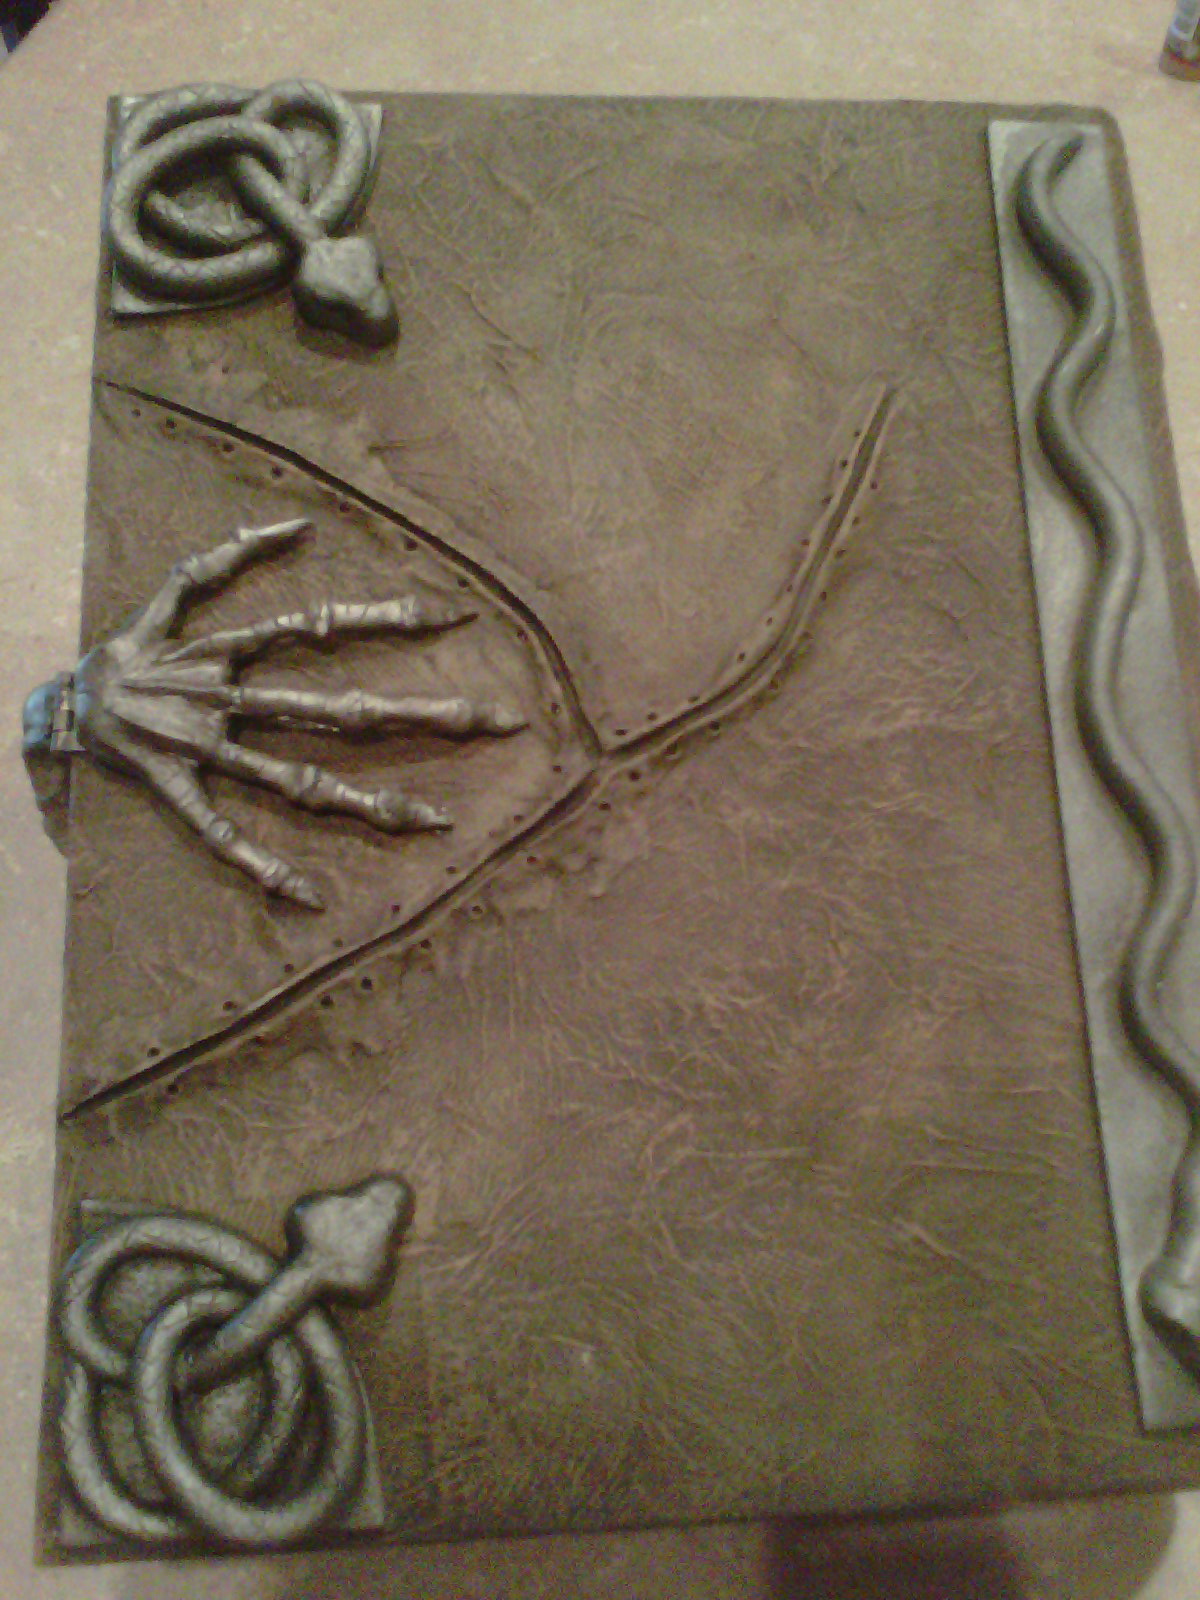
So here I am making the spell book from the movie "Hocus Pocus"
This time I started by covering the book in a skin of tissue paper using mod podge.
It dries really quickly.
Next using clay I made the seems where the skin is sewn together.
I used Das red cause that's what I have on hand.
Paper clay would be good too, or any air dry clay that doesn't shrink.

Using the same tool I poked holes for the stitching.

Here is another hint, add a small layer of the tissue paper over where the clay meets the book.
I did it on the front but forgot on the back. If you look at my finished photos,
you can see the seams in the back, but the front is blended.
Next I made a little eyeball out of Fimo.
It wasn't a full sphere. I just a rounded a half circle of a little lump of clay baked it.
Then hand painted the iris, and added a gloss sealer to make it look wet.

I added the lids using Creative Paper Clay this time.
Oh I forgot to mention after the book and clay was dry I painted it with a mix of raw umber, and raw sienna. then I did a black wash, and dry brushed on more raw sienna.
Next I glued my eyeball on the box.


Then I used more paper clay and blended my eyeball into the rest of the cover.
And of course painted it to match.

Next I started work on all the metal embellishments.
Using fimo I sculpted one of the snakes and baked him.

Then I made a base.

I pressed my mostly cooked snake on top and baked it again until it was done.

There are four of these babies on the book, so instead of sculpting all of them.
I decided top make a mold, and do copies.

I used silicone for the mold and two part resin for the copies.
All available at most craft stores. Good time for 40% off coupons.
the mold kit is about $20 and the resin was like $15. I used about half each kit for this.

Sturdy resin copies in no time!

I painted them with black spray paint and a light spray of silver over top.
Next I made the clasp that goes around the eye.
In the fimo again, I made a ring that fit around my eye and baked it.

I wanted it to be a functioning clasp so I used these tiny hinges from Lowe's.

I made a brade of fimo

I smushed it in and attached it to my hinge.
Also (not pictures) I stuck a piece of coat hanger
through the entire thing to make it strong, and then baked it.

I attached them with gorilla glue and then covered it in fimo to make it all one piece.

For the little hand on the back I used coat hanger pieces and just sculpted over it with fimo.


All these pieces when done received the same coat of black and silver paint.
There was is also a long snake on the spine of the book.
I forgot to take picture as I was sculpting , but he is also fimo.
After all the silver pieces are glued on I did a wash of watered down raw umber,
to make them look aged and tarnished.

I still need to add the threads, and there is some detail on the spine, and a couple jewels.
But that is all easy and I need a break form this book for a little while.

The back
the side

opening it

I may need to do something about the inside though.....

Edit: And we have stitches....

I used 13.7m hemp cording I had on hand
(you can find it in the jewelry section at craft stores ).
I simply cut and glued the stitches in.
I pushed it in the holes with an extra large sewing needle.
The inside is so funny and unexpected!
ReplyDeleteWow, those are absolutely stunning!! Great work. Thanks so much for sharing with the rest of us.
ReplyDeleteCheers!
Love it! That's beautiful - even with the butterflies inside!
ReplyDeleteWow! Fantastic! Thanks, you make my day!
ReplyDeleteBeautiful work as always Mizerella! You have a gift, thanks for sharing with us! :D
ReplyDeleteThank you all for your kind words. :)
ReplyDeleteHello there, I was wanting you to make me a hocus pocus book. I will buy it please contact me 6027901301 misskamitafoya@yahoo.com
DeleteSorry for not replying sooner I've sent an email you way ok. :) Thank you
DeleteWhat glue do you use to stick the baked Dino to the book pls
DeleteYou are so talented. You should so special effects for the movies. So impressive to say the least.
DeleteWonderful!
ReplyDeleteThanks for sharing, Mizerella! I enjoyed the visit!
That is soooooo cool!!! Love it!!! :)
ReplyDeleteI'm absolutely blown away by your creations! They are utterly fabulous!! I'm so glad that I've found your blog.
ReplyDeleteThe books rock! I love the details!
ReplyDeleteYou are wonderfully talented and crafty! Love the ideas and your instructions are undeniably easy to follow. I hope to post soon what you have taught me... Great stuff!
ReplyDeleteLove this blog; and I can see you have the same fondness for papier mache that I do (I have all kinds of weird possessions that are made from/with it.)
ReplyDeleteAmazing work! The book cover is so scaretale like.
ReplyDeleteDo your kids realize that insanity is hereditary?
ReplyDeleteWow. You are so talented!
ReplyDeleteThank you so much everyone! Your kind words make me feel so warm and inspired to do more. Sometimes it feels like no one I know appreciates this kind of stuff. It comforts me to know there are kindred spirits in this world who do.
ReplyDeleteBy the way I have a facebook page now www.facebook.com/Mizerella
I sometimes post extra things there if you want to check it out. Love you all and thank you again for the mood boost.
Do you ever go on www.hauntforum.com? I just found it a few months ago. All the members there build props and share ideas and give each other advice and help on projects! It's really an awesome community. They'd LOVE to see some of your stuff, I'm sure! This last book is particularly beautiful. :) I really am enjoying going back through your archives here!! Love it...
ReplyDeleteHi Kate! I am on Halloween Forum... I'll have to check out Haunt Forum as well. Thanks
DeleteFantastic job! Would you ever be willing to make and sell one?
ReplyDeleteHi there Mary! Yes after Halloween I will start taking commissions again and get my Etsy back up to date. Thanks! :)
DeleteWhat is your etsy shops name?
DeleteI was wondering if you still have the molds that you made the snakes with? I would love to try my hand at making this, but if possible just get a few of the pieces from you ready to go? Let me know.
ReplyDeleteI love your stuff!!!!
s_e_brwn@hotmail.com
This comment has been removed by the author.
ReplyDeleteWondering what you would charge for this??? Very interested!
ReplyDeleteMy email is michaela.lafazia@gmail.com
Thanks!
Incredible work!
ReplyDeleteWow! You are amazing! Magnificent book!
ReplyDeletehow can we get the inside of the book? (the spells) if anybody wants the charmed book of shadows in PDF search for it in google, you can find the entire book with all its contents with a fast search on the internet, I made my own with a wallpaper cover
ReplyDeleteI love your hocus pocus book. Could you email at mauriciom1761@gmail.com. I would love to have one. Could you let me know about how much and how long it would take to have you make one. Thank you. My name is Kayla.
ReplyDeleteI have a neice who is obsess with hocus pocus and im not good with crafts how much would it cost to have one already made?
ReplyDeleteHello, how much do you charge for a book like this one?
ReplyDeleteBest regards
Make one its easy
DeleteI'll be making this book very soon thank u for the step by step
ReplyDeleteهل تريد شراء اثاث مكتبي وتبحث عن افضل شركة اثاث مكتبى هناك الكثير من شركات الأثاث المكتبي في مصر ، والكثير من العملاء يرتبكون عند اختيار أفضل شركة ، في رأيي ، أفضل شركة أثاث مكتبي في مصر هي ستار وود تم تاسيس الشركة عام 1998.
ReplyDeleteNiveeta Designs - one of the best interior design companies in Delhi NCR - one of the top corporate interior designers. We provide an exceptional interior for the office. We are associated with expert interior work contractors in the Delhi NCR. Our interior company in Delhi can bring a new style to your workspace.
ReplyDeleteNiveeta Modular Systems is one of the largest manufacturer and supplier of Modular Office workstation pan India. We are best office furniture company in Delhi. We provide an exceptional furniture for the office. We are associated with expert furniture work manufacturer in the Delhi NCR. Our Furniture modular office workstations can bring a new shine to your workspace.
ReplyDelete