Showing posts with label Paper Mache. Show all posts

Wednesday, May 16, 2012

#31 Scarecrow

I have always loved scarecrows.

They are not that hard to make and can be practically free if you have some basic stuff laying around the house. Scrap wood, old clothes, hats, gloves, some burlap, tree trimmings, old sheets etc.... the possibilities are endless.
This is the guy I am making here!


One of my favorites scarecrows is from the movie Sleepy Hollow.
So simple, So classic, So Halloween!

sleepy hollow


The first scarecrow I made was after seeing that movie. I did it in an afternoon with some wood, old branches, black plastic, and a Funkin( fake pumpkin).


my guy

Ok my early work is not the most artistic, but it was last minute. I was very proud of him at the time. He stood 8 feet tall and got a lot of attention that night. Actually I kind of miss him.
May have to do a new version soon.


So I eventually stumbled across Pumpkin Rot.
A lot of people know him well. He is an amazing artist and The Scarecrow Master!!
If you haven't heard of him, go right now to his page ( should be in my links ) and look at his outstanding stuff!


So Pumpkin Rot has a scarecrow on there named Johnny Appleseed.
I love it so much. It instantly reminded me of the Jeepers Creepers 2 scarecrow. I remember wanting to make one too when I saw that movie. Only his has that signature eerie, rural, gothic Rot spin.

Jeepers Creepers 2


So my guy is.... inspired by them both.


I am not exactly sure how Pumpkin Rot makes his stuff, but this is how I decided to do mine.
Mostly with stuff I had on hand.


I have had a couple of these large plastic skulls sitting around for a while. I got them on clearance a few years back, never could figure out what to do with them. They are bigger than a normal skull not very realistic looking. So I decided to use one here.


Fist thing I did was build a thick neck.... I wanted that confusion "is that a person in there?" I did this by balling up news paper and building it up securing with masking tape. I just played with it until it looked right. Then I covered it with several layers of paper mache to make it very strong.

Neck built and taped ready for paper mache.


Sorry  I forgot to take pictures of the next two parts.

This thing needed to be weather proof so after the mache was completely dry I did two coats of DryLok.

I then hollowed out the crumbled newspaper inside the neck, all the way up to the underside of the plastic skull. I DryLoked the inside too sealing all paper parts.


Next I got some scraps of burlap and dipped it in just plain elmers glue. I draped it all over the head, building features with the wet burlap. 


Thick heavy brows, stronger cheek bones.
 I left the eyes somewhat uncovered, built up the nose a little leaving nostrils holes, and left a gap for the teeth to bite through.
All the better for him to see you with, smell you with, and EAT you with!!!


The glue made the burlap a little brittle when dry, just in the hanging parts really. 
I probably could have used Monster Mud instead, I was just too lazy to make it. 

Anyway the next step made it strong.


After he was dry I did several coats of DryLok. 


I painted the whole thing with a brown house paint (again, gotta love the oops paint).
After the base color was dry, I washed it with watered down black paint.
Then I dry brushed on a light burnt siena/ yellow ochre mix, to highlight.

Sorry so blurry. This was my old camera hopefully my new one is better.


For the hat, I just cut  a circle of cardboard and cut out a hole for his head. 
I wanted a very tight fit so the wind wouldn't blow it off.
I covered the part of his head sticking out with plastic wrap, and then covered that with duct tape.
I used crumbled newspaper and masking tape to give the top of the hat the shape I wanted. 


The red (it's all I had) duct tape covered form


The hat got several layers of paper mache, a layer of scrap fabric dipped in elmers, 3 coats of dry lock, and paint (same base coat and black wash as the head but a taupe color on the highlights).
All of these drying completely between each layer of course . 


The hat before paint


So before all this, I had found the perfect trench coat at good will.
This is the key to the look I think. I actually see them a lot at good will. This one was particularly large, which was even better.


Again, sorry for the lack of images for the next part, but it's pretty simple.


I made a cross with two piece of scrap furring strips.  A longer one about 6' going vertically, and a shorter one, about 3' horizontally. Secured them with screws.

The top of the vertical piece came up about a 12" from the horizontal wood strip ..enough to fit his head on securely.

I played with the head a bit, deciding on the right position. I wanted it slouchy... like the inspirations.


I then marked the best spot and drilled a hole into the plastic underside of the skull. I had to cut it a little with and exacto knife to get it big enough to go over the end of the furring strip.


I put the jacket on the cross before going further.

I pulled the sleeves back so I could work with the arms.

I wanted the twig arms and body like pumpkin rots.
I like how this is confusing and more supernatural. I imagine coming upon it "Could that be a man? No it can't be. But it seems Alive!  WHAT THE HELL IS IT?!!"

The twig arms in place, sleeves pulled back for working.

So attaching the twigs is fairly simple. 
I just stacked and layered branches until I liked the way they looked.
 I used a combo of twine, floral wire to secure them.
 I then dripped hot glue in between the branches and all a round to really make it strong.


For the body kind of the same thing I used bigger twigs and branches and wrapped them up trying for a
vine like look. 


This pic was before I glued them. I removed the twigs and stained the parts of the furring strip that would be showing.


I noticed his shoulders (where they meet the neck) not looking thick enough.
If you look at the picture a few above (with both sleeves pulled back) you can see kind of what I mean.

So using some coat hanger wire I rigged a little something to beef it up. 

Much fuller shoulder line now. Just need some stain and his hat now.


So to secure him in the ground. this is very important so he doesn't become top heavy and snap.

I can't believe I didn't get pics of this important part!

I used a very long and thick wooden tree stake and pounded it the earth. It almost went up the whole way of his back.  A small cross piece was nailed to the tree stake where the bottom of his furring strip rested. I secured it with huge zip ties and screws it wasn't going anywhere! It's actually not complicated, but those directions are making it sound harder than it is. In fact anyone could probably figure out a dozen other ways to stake him down

(Ya know what, I am going to draw a diagram of what I did. I'll edit and add that here later.)


So anyway here is an image of him complete.


 I love how he rocked, just slightly in the wind, and his coat looked amazing flowing in the breeze. 
At night I had a red uplight shinning on him.
But still wind or none, day or night... he always looked very sinister. 

He was a wonderful spooky addition to our yard this year.


Thanks for stopping by.


Tuesday, September 27, 2011

#30 Haunted Tree


As I have mentioned before, I am doing a Haunted Forest/ Faerie Tale Witch Cottage theme in my kitchen this year.

So I awoke one night and realized I must have a haunted tree dividing my kitchen from my living room! I became obsessed with the idea, and immediately started trying to figure out the best way to do this.


First I decided I wanted it to be compact and capable of being broken down in two parts for storage.
It also needed to be tall (my ceilings are 10 ft) but incase I move to a shorter or taller house one day it needs to be adjustable. I also wanted the branches to sprawl across my ceiling. 
I had a lot to consider!


So I decided to use concrete pour molds for the base. 
They are around $10 each for the 12" size. The two I bought, one was actually a little bit smaller and fit snugly inside the other, perfect for what I had in mind!

I thought about using chicken wire, but I really hate using the stuff and if I can avoid it I will. 


I found some flexible black irrigation pipe in our garage and decided to use it as a stopper for the top tube to rest on. 
I hot glued it just a little to hold it n place (about 6" from the top)  then went over it in Gorilla Glue to really make it strong. 

PS. The bottle exploded and made a huge mess. I still have glue on me! 
 See, what a Mess!


I wanted a strong base since its so tall. 
I forgot to get a cheap piece of plywood when I was at the store, but I was into the project by now and not wanting to run back out, I grabbed a round plywood circle I already had laying in the garage and gorilla glued it on the bottom.


When all was dry, I crumbled up newspaper to taper it down. I also cut out a hole for my uplight to go in the back.


For the roots I crumbled up balls of news paper in varying shapes using masking tape to secure them.

I coneccted them with more paper at the joints and more tape.


When I figured out the shapes I wanted the roots, I started filling in gaps with more crumpled paper and tape. Then hen it all got several coats of paper mache and then several more until the base was super strong.


On the top half I started the face.
 I just drew on a face and cut it out with a serrated knife.


Here it is sitting in the bottom half.


Next using Celluclay I built the facial features


I started building up ridges in the tree with twisted up newspaper and tape, then went over in 
more paper mache.

I tried to match the bottom ridges to the top as best I could.
Also, I used tape as a guide on the top half to show me exactly where it met the bottom.


Here are the two halves apart all paper mached 
 and together


For the top branches I used coat hangers and taped them to the tree really good before buliding up and then paper maching over the whole thing.

I wanted to make more branches but I really am behind schedule right now, so it got only a few for this year maybe I will add some next year..


For the bark I decided to use more celluclay because I have a bunch of it. I used a whole bag on this tree.
I would just glob it on and then smooth it out a little in sections.
Then I would get my fingers a little wet and scrape it to make my bark texture, clumps and lumps are a good thing.


Here it is finally dry and ready for the paint.


I used a base coat of a charcoal black color I had on hand called fittingly called  'black magic'.
As I was going I would brush on and blend in (while it was still wet) a brown color in the highlight areas, just to give it a little more depth of color. 


Lastly I dry brushed on a lighter taupe color. 
No closeups of that...Hmm I need to take a good bark pic too and add it here.


I decided for now to just use some tissue paper tacked behind the face diffuse the light a bit.

For the top branches crawling across my ceiling, I can't make them permanent because like I said it needs to store and I don't want to be married to this height incase I move. 

So I took some old branches I had saved from the last tree trimming, using eye hooks and fishing line I attached them to the ceiling with the bases just resting inside the top of my tree.

 Now they have the appearance that they are coming out of the tree but they are really just hanging from the ceiling over it. Also, this way I can add more branches and fan it out as far across my ceiling as I want.


I will be adding some green to the branches as well soon,
 but for now I need to go put away that laundry in the picture.


NOTE:
I will be adding pics soon of the finished tree and it's creepy hanging greenery. 
Also maybe a cleaner house in the next picture.


Tuesday, August 2, 2011

#27 Don't Judge a Book by it's Cover!

So here is something I have been wanting to try for a while.
 This craft is so easy and there is no end to the cool things you can do!

I already have about 10 ideas for more books in my mind!


For my first two attempts, I decided to go with replicas from movies I like.


This a simple and easy replica from the Evil Dead 2. 
 I just took an old hard cover book. 
This one is just some mediocre cookbook. 


I drew on the face, just sort of eyeballed it not trying to be exact.


I built up his features and some big wrinkles with paper mache paste and paper towels.
Then I covered it with a skin of paper mache napkins and paper towels.


I let it dry to the touch opened like this for just a little bit.
Then I bound it shut with twine until it was completely dry, for about 2 days.
Unfortunately I didn't take a picture but this step but it is a very important. 
If you don't the book cover can warp out too much.


Yes, that is an ear on the other side.


After he was dry I began the painting. I used raw umber for the base color, red for the mouth parts.

I did a black wash and then dry brushed on gray. 
I highlighted the teeth and the one eye with a dry brush of yellow ochre.


The next is a little more complicated and I got a little carried away.
I started with a large cardboard book box I got on clearance at Micahel's

I know it's pretty, and I am about to destroy it!
I was actually a little sad because despite my dark inclinations, I do like butterflies.

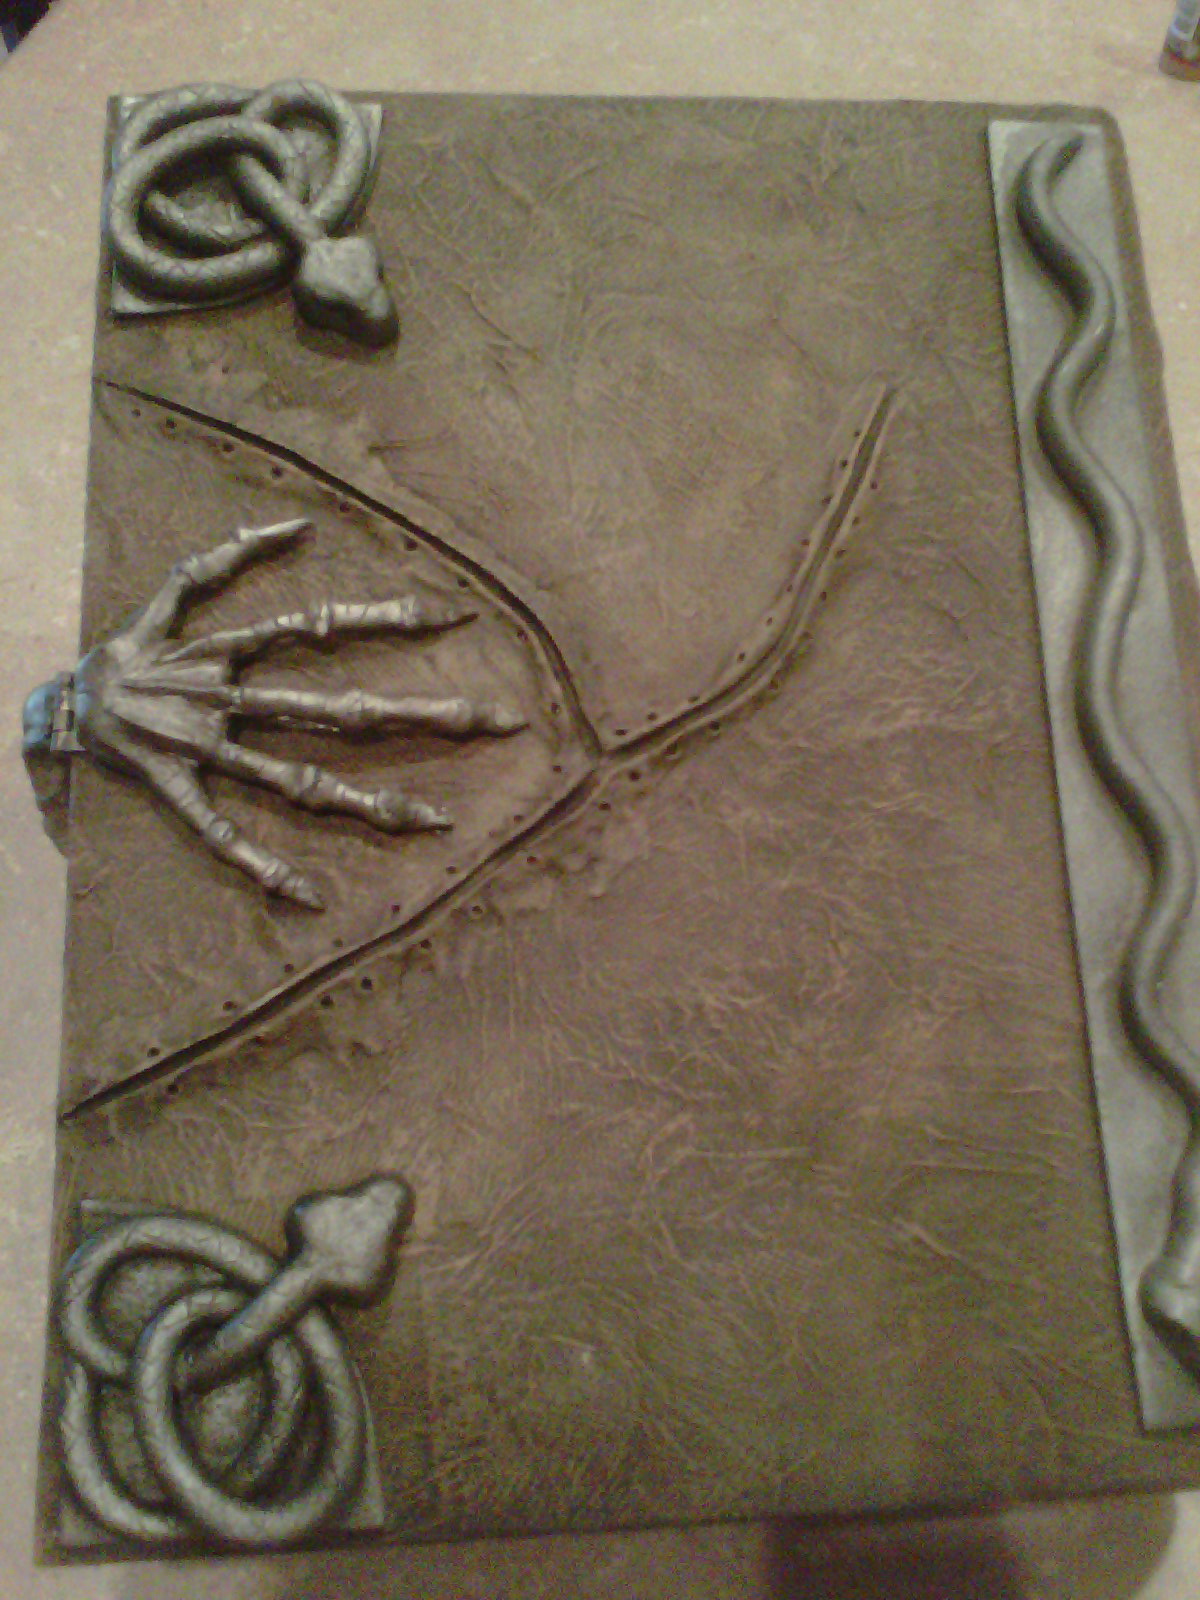
So here I am making the spell book from the movie "Hocus Pocus"

This time I started by covering the book in a skin of tissue paper using mod podge. 
It dries really quickly.

Next using clay I made the seems where the skin is sewn together.
 I used Das red cause that's what I have on hand. 
Paper clay would be good too, or any air dry clay that doesn't shrink.


Using the same tool I poked holes for the stitching.
Here is another hint, add a small layer of the tissue paper over where the clay meets the book. 
I did it on the front but forgot on the back. If you look at my finished photos,
you can see the seams in the back, but the front is blended.


Next I made a little eyeball out of Fimo. 
It wasn't a full sphere. I just a rounded a half circle of a little lump of clay baked it. 
Then hand painted the iris, and added a gloss sealer to make it look wet.


I added the lids using Creative Paper Clay this time.

Oh I forgot to mention after the book and clay was dry I painted it with a mix of raw umber, and raw sienna. then I did a black wash, and dry brushed on more raw sienna. 

Next I glued my eyeball on the box.


Then I used more paper clay and blended my eyeball into the rest of the cover. 
And of course painted it to match.

Next I started work on all the metal embellishments.

Using fimo I sculpted one of the snakes and baked him.


Then I made a base.


I pressed my mostly cooked snake on top and baked it again until it was done.

There are four of these babies on the book, so instead of sculpting all of them. 
 I decided top make a mold, and do copies.


I used silicone for the mold and two part resin for the copies. 
All available at most craft stores. Good time for 40% off coupons.
the mold kit is about $20 and the resin was like $15. I used about half each kit for this.

Sturdy resin copies in no time!


I painted them with black spray paint and a light spray of silver over top.

Next I made the clasp that goes around the eye.  
In the fimo again, I made a ring that fit around my eye and baked it.


I wanted it to be a functioning clasp so I used these tiny hinges from Lowe's.


I made a brade of fimo

                                          
        I smushed it in and attached it to my hinge. 
Also (not pictures) I stuck a piece of coat hanger 
through the entire thing to make it strong, and then baked it.


I attached them with gorilla glue and then covered it in fimo to make it all one piece.


For the little hand on the back I used coat hanger pieces and just sculpted over it with fimo.


All these pieces when done received the same coat of black and silver paint.

There was is also a long snake on the spine of the book.
I forgot  to take picture as I was sculpting , but he is also fimo.


After all the silver pieces are glued on I did a wash of watered down raw umber,
 to make them look aged and tarnished. 


 I still need to add the threads, and there is some detail on the spine, and a couple jewels. 
But that is all easy and I need a break form this book for a little while. 


The back


the side


opening it 


I may need to do something about the inside though.....


Edit: And we have stitches....


I used 13.7m hemp cording I had on hand 
(you can find it in the jewelry section at craft stores ). 
I simply cut and glued the stitches in. 
I pushed it in the holes with an extra large sewing needle.